


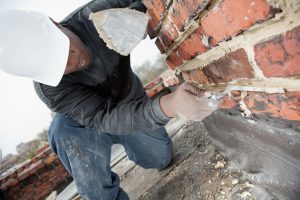
The mortar joints are what hold brick masonry together, so you want to fix them if you come across any damage!
Do you have old masonry walls or chimneys in need of repair? The crumbling mortar joints of an otherwise beautiful brick wall can make it a real eyesore. But with the right tools and a heaping serving of patience, anyone can learn tuckpointing (or pointing or repointing). If your walls are beyond simple repair and need restoration, follow this guide, and breathe new life into your old masonry.
Tools And Materials
Before you dive into this project, make sure you have everything that you’ll need to do it right. You’re going to need the mortar mix to replace the old crumbling mortar (be sure to get the right type), and a whisk broom, wall trowel, tuckpointing trowel, and mortar finishing tool. You’ll also need an angle grinder, flat chisel, and hammer for digging out the old stuff. Finally, make sure you have safety equipment: a dust mask, rubber gloves, and safety glasses.
The Repair Process
The mortar joints are the most flexible (and weakest) parts of brick work, so they are the most prone to deterioration. Any water and ice that seeps into them and the temperature expansion they experience over the years eventually causes the mortar joints to break down. The first step in repairing the joints is to chip out old mortar with a chisel and hammer, or for really hard spots, the angle grinder (be careful, this heavy duty tool can easily chip the brick). Remove 3/4 to 1 inch of old mortar or enough to get a solid brick base to bond the new mortar.
Next, clean out the new cavities with the whisk broom (compressed air would also work), then mist them with water. Mix your mortar carefully according to the instructions; it should have a stiff but not crumbly consistency. Fill the horizontal joints first and the vertical joints last. Load the prepared mortar onto the brick trowel and push it into the joint cavity ¼ inch thick slivers at a time using the tuckpointing trowel. The work is slow, so mix small batches of mortar so it doesn’t dry out. Finish the joint with the appropriate tool that matches the current joint profile. Finally, clean the bricks with a soft bristle brush to remove any mortar chunks on the brick face.
Contact Del Prete Masonry for Your Demolition Needs
Whether you are ready to start your next masonry project or are still hesitant and have questions, Del Prete Masonry is here to help. We have the experience and expertise to get it right the first time. Questions? Want to visit some of our residential or commercial projects? Ready to set up a consultation? Feel free to give us a call at 410-683-0650 or visit us online. We are happy to serve Baltimore City and County, Harford County, Carroll County, Anne Arundel County, and Howard County. To see examples of our work and to keep up with our new and exciting projects, be sure to Facebook, Twitter, Google+, and Pinterest.
Tags: brick masonry, masonry materials, mortar